Psyched on Sonics: Recording a Full TV Commercial Score In One Day — Without a Studio
Every month, Matt McCorkle of EqualSonics.com brings you a day in the life of a New York City recording engineer.
The Mission: Recording a song for a TV commercial in a Brooklyn apartment
Producer and multi-instrumentalist Michael T contacted me about recording and mixing a song called “Snow Falls in Brooklyn” for a television commercial. Michael T does song commissions for just about anything. Give him a topic, genre, theme, or a melody and he’ll craft a song for your purpose.
With most submissions for television or advertisements, one is given a rough guideline of what the company wants from the song (a particular tempo range, genre, style, feel and instrumentation). An example of a request is as follows: “Beat must be mid-tempo between 100-110BPM with a driving chorus and relaxed verses. Lyrics should be clean, but with high energy and clarity. Lyrics should refer to “having a good time” and “living life to the fullest.” Then a few reference songs are provided in the style of how they would like their finished product.
When Michael T does a TV commission, one thing is of utter importance: turn-around time. We had one day to record, edit and mix this track before submitting it for television play the following week.
Listen to the master mix of “Snow Falls in Brooklyn” to hear where all this is going:
Snow Falls In Brooklyn – Michael T Master Mix
The Location
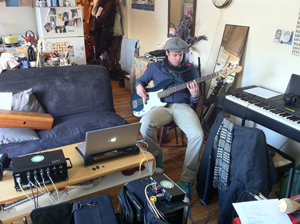
The spot at which this production took place was at a mutual friend, Kalen‘s apartment in Brooklyn. She too is a multi-instrumentalist, who just happens to have about every possible instrument in her apartment, how perfect! Bass, keys, guitar, djembe, xylophone, marimba, glockenspiel, shakers and various auxiliary percussion.
The apartment is located in a relatively quiet neighborhood of Brooklyn, with little traffic outside in the street. This was a crucial factor in picking a location to do this production. When recording on location most places will not be 100% soundproof — I’ll be lucky to get an apartment that is 50% soundproof.
This particular apartment was secluded in the back of the building on the second floor. That’s great because recording from the back of the building dramatically reduces any noise from cars or people in the street, while being on the second floor reduces any low-end frequencies creeping up from the nearby subway tracks. The location was “sound,” so to speak, in the sense that it was as soundless as possible.
The Arrival
Once at the apartment I laid my gear down and took a brief walk around, moving to and from each room listening for any noise that would be detrimental to a recording. I am particularly interested in listening for AC noise, gas pipes, computer fan noise and birds chirping or dogs barking. Since this is New York City after all, I was listening for the possibility of rats clawing in the wall, fighting neighbors or other musical neighbors. All of these factors could suddenly ruin that “golden take.” It is essential to have a preliminary listen of the rooms to reduce the chances of such a horrible catastrophe.
Michael T and I began to examine the instruments that were so kindly lent to our use. We played different acoustic instruments in different rooms to get a feel of how each interacted with that particular room. After I had mapped out a game plan of where I wanted to record certain instrumentations, I went to start my setup of Equal Sonics Mobile.
The Digital Setup
The setup of Equal Sonics Mobile takes approximately 20 minutes. I start by unpacking and laying all of the equipment out within hand’s reach. This makes it easy to see and grab the equipment as I need it, in addition to augmenting and changing the rig quickly throughout the session, depending on any particular task.
WARNING! This section of the article gets technical. If you are not ready, uninterested, afraid of or become nauseated by reading excessive nerd talk, I recommend that you skip ahead to the “Time Is Ticking – Let’s Begin The Tracking!” section of this article a few paragraphs down.
Optics
Equal Sonics Mobile is based around ADAT (44.1/48 kHz) and S/MUX (88.2/96 kHz) optical protocol. I find ADAT and S/MUX to be a great protocol for this type of setup. The cables are lightweight, easy to break down and store, inexpensive and easy to find at various retail outlets. This system allows for total control over monitoring levels, individual artist cue mixes, and any other mixes that might be necessary, such as a video camera feed.
All of these optical connections are fed to an RME Digiface which inputs ADAT and outputs ADAT in groups of 8 channels at a time, when operating at 44.1 kHz sample rate. The RME Digiface is then fed to an RME HDSPe ExpressCard, fitted into a MacBook Pro ExpressCard slot, which allows for the transfer of these channels in and out of Pro Tools.
I begin by connecting the optical cables from the analog to digital converters optical outputs to the optical input sections of the RME Digiface. These connections are made to input my digitally converted pre-amp signals into Pro Tools. After the inputs are taken care of, I must connect another set of optical cables from the output sections of the RME Digiface to the digital-to-analog (D/A) converters. The D/A converters are for monitoring purposes, so that I’m able to provide myself with a control room and headphone mix, as well as providing personalized mixes for each artist, with a HearBack cue system.
Telling Time
Once I have my optical connections fitted and ready for use, I need something to tell them all exactly at what point they should do their job. I hook up every piece of digital gear to an Apogee Big Ben master clock. This is to keep a consistent sample rate across the entire digital setup and reduce jitter. A good analogy of what a master clock does for a digital system is as follows:
I’m at the studio and have a lot of work that needs to be completed before my client arrives at noon. I have 4 interns available to help with preparations. I need to send each of them out into the streets to get various items needed for today’s session. Each of these interns have 4 different watches, all yielding slightly different times. When I ask them to be back at noon sharp, I can assume that each intern will follow their respective watch. Of course, this will be inaccurate because all of the watches were not synchronized. One will show up at 11:56am, another at 11:58am, another at 12:03pm and yet another at 12:05pm. To their credit, each of these interns’ watches displayed noon as they arrived. However, when my timepiece displayed noon, I was stuck with two early interns and two late interns.
To remedy this situation before I send the interns on their tasks, I act as a master clock and synchronize each intern’s timepiece to my timepiece. Therefore, when my watch displays noon… their watches will display noon! As you can see, they would all be back at noon according to my watch and the session would go off without a hitch.
Now of course 24-hour clocks and digital clocking systems do not keep the same time, but that simple analogy can shed some light on how a master clock commands a digital recording environment, in regards to keeping a consistent sampling rate across the entire system. Sample rates must remain consistent across the entire recording system, otherwise phase-shifts can occur within the timing of samples. This is jitter, and yes, it is an audible problem!
The Analog Setup
After all the digital connections are made, I get to work on the analog side of things, making the connection from the 8 channel Audient microphone preamp to it’s 8 channel analog-to-digital converter counterpart. The API lunchbox, containing pre-amps, gets connected to an analog-to-digital converter as well. With the microphone pre-amps connected now, all that needs to be done is hooking a microphone up to whichever pre-amp we choose to use.
Time Is Ticking – Let’s Begin The Tracking!
With Equal Sonics Mobile up and running, we were ready to start with this production. I let Michael T sift through my personal drum sample library. This library contains samples that I have personally sampled, collected from friends, or received in sample trades with other producers/engineers. He had chosen a kick and snare sample he wanted to lay through the entire track as a skeleton and timing device. I programmed the samples into place and sent a copy of the drum tracks to his individual HearBack cue mixer. I labeled his mixer so he knew exactly where he could set his drum levels. The kick and snare drums were to be the only electronically programmed instrument on this track. Let’s get moving.
Bass
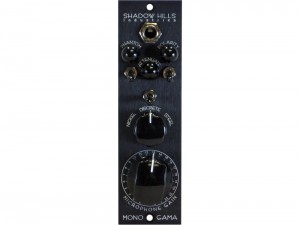
With the electronic drums laid down, we moved onto bass guitar. For this I decided to use a Shadow Hills Mono GAMA Pre-amp which has a hi-impedance instrument input. This pre-amp also allows the user to switch between three types of output transformers: Steel, Nickel and Discrete. We liked both the Steel and the Nickel output transformer sound on this particular bass guitar. So, we decided to have a little fun with this unique pre-amp option.
During the verses, we opted to use the Nickel setting as it was slightly more gentle in the low-mid frequencies and allowed the bass to breathe in the 1-2khz range. However, once the hooks hit we swapped Nickel for Steel, which gave us a heavier, more driving bass sound that was perfect for our goal of having the hooks drive and feel heavier than the verses.
With three passes — one pass for the verses, one pass for the hooks, and one pass for the bridge — we were finished tracking bass and time was ticking. Onto acoustic guitar!
Acoustic Guitar
We ended up picking the back bedroom for this acoustic guitar tracking. It was quiet, comfy, and the wooden floors provided a pleasant, warm texture for this particular acoustic guitar. I had Michael T play in various spots around the room listening for the best placement for him to track. We ended up placing him with his back towards the closet pointed to the center of the room.
Once he was situated in a playing position, I began my microphone placement. Since the guitar is going to be the main instrumentation on this track, I wanted to create a large stereo image of the acoustic guitar. I placed one AKG 414 pointed between the guitars sound hole and where the fret-board connects to the body of the guitar. I placed a second AKG 414 at the neck of the guitar around the 3rd and 4th frets. This setup was meant to pick up fret nuances and create a large and sonically pleasing stereo image.
I shut the bedroom door and went to the other room where I monitored on a set of active monitors. Panning both microphones 100% opposite of one another in their respective Pro Tools tracks, I listened for phase discrepancies. I loaded a Vectorscope plugin on the master fader of Pro Tools to have a visual display of the two channels phase relationship. I didn’t hear anything un-natural and the Vectorscope meters read in the +1 range, meaning the channels were not canceling frequencies with one another. Pleased with the placement, I turned off my monitors and put on my headphones for tracking, in order to ensure that the active monitors would not be picked up by the microphones in the other room.
We put down a few different sections of acoustic guitar. Once the main sections were established, we started adding doubles of the acoustic guitar onto of each section to make the sound thicker. After the thickening was complete we laid down some overdubs, which were essentially varying motifs to make each section unique (in order to hold the listeners interest).
I turned the active monitors back on while Michael T and myself had a listen to what we tracked. We were both pleased with the performance and the sound, but the song was far from complete…
Padding
Now that the drums, bass and acoustic guitars were laid down, we wanted to add a bit more ambient texture to certain parts of the song. Fortunately, this apartment came equipped with a Nord Electro synthesizer. We patched it into a stereo line-amp that was directly patched into Apogee analog-to-digital converters, which in turn, allowed us to monitor these synthesizers in Pro Tools.
Switching between various patches on this synth, we came across a nice Rhodes sound. Tracking the Nord Electro throughout the hooks gave them a bit more padding and feel. After laying the synth down, I added a slight ambient reverb and a slight delay set at 1/2 notes with minimal feedback. The effects were added for additional sonic padding and to create an ambient, spacious texture.
Step Back
We were feeling good about the progress of the track thus far. The drums and bass were filling out the rhythm well, the acoustic guitar was doing rhythm and lead parts, and the Nord Electro was assisting the hooks by filling them out sonically.
There were a few more things left to do before we could edit, mix and submit this track. We needed to add what Michael T likes to call “garnish.”
Garnish With A Side Of Ear Candy
Djembe
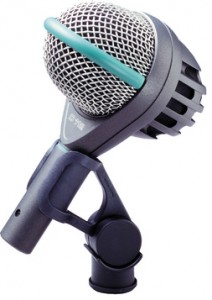
We grabbed a djembe with the intent to add some nice sub bass tones to the kick drum in the verses. The djembe at the apartment had an incredibly rich, deep tone. We wanted to sample the djembe and mix it nicely underneath the kick drum hits. We decided to track this instrument in the bedroom with the wooden floors. I was only concerned with the bass tone of this instrument, so I placed an AKG D112 under the djembe.
Michael T played a few deep notes on the djembe of various intensities to capture different note sustains. This was not done while listening to the track, but thankfully the drum happened to be tuned to the key of the song. Lucky! Had it not been, we would have had to have gotten crafty with slight pitch shifting. We ended up using a sample that was almost a 1/2 note long, at our session tempo, and placed them with the kick hits in the verses. Later, I will mix them underneath the kick drum by slicing the high frequencies off and taking some muddiness out of the drum around 300 Hz to get a nice sub-drone sound.
Glockenspiel
The purpose of the glockenspiel was to add a variable attack to the Nord Electro’s Rhodes patch. Michael T played the glockenspiel at the beginning of each Rhodes note. We could now control the intensity of this newly added Rhodes’ attack by varying the volume of the glockenspiel track!
I miked the instrument with two AKG 414’s- one positioned on the low keys and another on the higher keys. Once more, after miking, I went to check my Vectorscope to make sure that there was no phase discrepancies. I sent both the 414’s to a stereo track so that I would be able to control the volume with one fader.
Shaker
The last garnish we added was two different shakers. One of them was a lightweight, smooth-sounding shaker, which we had planned to put in the verse. The other was a larger, heavier and more jagged- sounding shaker that we used to cut through the hooks.
I planted Michael T in the bedroom once again, and got his shaker station ready. I used an AKG 414 with a slight LF rolloff @ 80 Hz to eliminate sub frequencies. In addition, I placed the AKG 414 in a narrow cardioid pattern, as Michael T was literally right in front of the microphone.
Singing In The Shower?
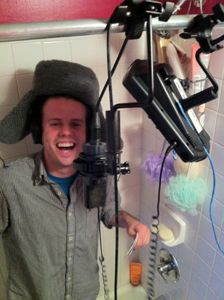
The instrumentation was complete! The sun was starting to set, and it was time to lay down the vocals. We went from room to room, seeking the best possible place to record vocals. The bedroom was too lively, the living room would be difficult with all the recording equipment, and the kitchen was too reflective. I had the notion that perhaps the bathroom would be just right. It was small, but not too small and had towels lining one side to capture reflections.
The bathroom turned out to be too dark, but I did not give up on it! I had Michael T sing from inside the shower pointing out, towards the wall of towels. Perfection! This angle provided a nice lively feel without any ugly reflections. We fixed an AKG 414, the workhouse microphone of this session, to the shower curtain bar and fitted it with a pop filter. I went back to my setup and had him take a pass through the track to get a feel of how these vocals would sound.
The vocals were sounding nice. I added a bit of reverb timed to the tempo of the track to provide a spacious texture around his vocals, and then we went through the various parts of the song starting with the first verse, layering each section with doubles and harmonies to thicken each section of the track. Once the main vocals were done, with their respective doubles and harmonies, we went on to add vocal ear candies throughout the track. These consisted of “Ooh’s” and “Aah’s” to provide a nice padding to the main vocals (a similar scenario to the Rhodes patch we used to thicken up the hooks).
The Mix!
Rhythm
Instrumentation was complete. Vocals were complete. It was time to mix this track and send it on its way! The sun was almost completely set and the apartment’s inhabitants surely on their way home, so we dove into the mixing process. I switched on the active monitors, hooked the system up to the apartment’s stereo and gave us both a pair of headphones. This provided three different methods of monitoring our progress. I then hooked up an Euphonix MC Control via ethernet to Pro Tools to make this process quick and efficient.
We started with the rhythm section, leveling out the drum samples, dejembe, bass, and acoustic guitar. Adding some compression and EQ, as needed, to each of the tracks. Moving on in haste, I created an ambient reverb, timed to the track’s tempo. We sent some of the rhythm acoustic guitar to this reverb, as well as the djembe. Once we were satisfied with the rhythm section, we moved on to the Rhodes, lead acoustic guitar, and vocals.
Lead
Leveling out the Rhodes, acoustic guitar, and vocals with one another, I began to add some compression and EQ to these tracks where I felt it was needed. I created a reverb to put my acoustic guitar in, and another for my vocals. The acoustic and vocal reverb were both timed to the tempo of the track, with exactly ½th note of time difference between the two of them to create slight separation.
Next, I created a delay for the vocals, and ended up using an 1/8th note delay with slight feedback. I wrote fader movements with the Euphonix MC Control via EuCon protocol into my Pro Tools tracks. The integration between these two is simply amazing! Riding the Rhodes in and out of the hooks crafted a very dynamic performance.
Listening
After all of these elements were put in their place, I started to make some final adjustments with effects, fader movements, panning and compression/EQ settings. Monitoring on all three systems (headphones, active monitors, apartment speakers) we felt that the mix was near completion. We walked around the room listening to the mix from various positions. I also left the room and listened to the mix from another room, after all, who watches TV with both speakers of equal distance from each ear forming a triangle (the correct position for mixing). Realistically, very few would take the time to set up such an intricate arrangement to watch a television show.
Concluding our critical listening, we were both satisfied with the final product. I printed a main pass of the song, an instrumental pass of the song, and just the hook of the song. This was so the end client could have multiple variations of the song, and use as they saw appropriate.
Time Was Up
It was a successful day of production. We submitted the track by 7pm, the deadline. Thanks to Kalen, we were able to have a place to record that was stocked up with plenty of instruments!
It is always fun and exciting for me to record in some difficult and challenging places. Making the location you’re provided with work — by listening to various rooms to figure out which will provide the best recording, escape from outside noises, and achieve the best finished product — certainly adds a unique and exciting element to the production process.
As the owner and operator of his own mobile recording studio, Matt McCorkle of EqualSonics.com is capable of bringing professional audio to anyone, anywhere, anytime. His specialties involves acoustic instrumental recordings, vocal productions, live tracking sessions, electronic music production and mixing. Whether in the studio or out in the field, Matt’s goal is simple: To create new music and sounds with passionate artists. To contact Matt please visit EqualSonics.com.


Donhenze
March 3, 2011 at 10:06 pm (14 years ago)Nice song. Nice production.